Sunday 19 August 2018

Blyth Valley Bridge Club #4

The last time Anna and I played bridge at a club together was here in February 2017 (see here). A year later, a second child, and we were even keener to have an afternoon out together. So with all three grandparents on duty, we headed back to Walberswick.

It's a great club, very friendly and lots of fun. Anna and I tend to do quite well by bidding competitively. This time there were some wild hands, and we bid 'em up.

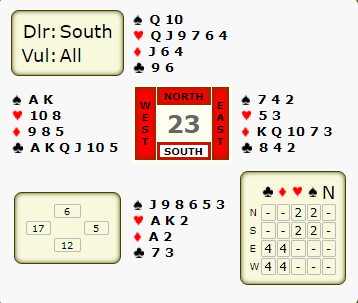
This was the very first hand, and I wasn't going lightly:

♠ T
♥ x x
♦ x x x x x
♣ A K J T x
♠ J x x
♥ Q x
♦ A K Q T
♣ x x x x
8
1210
10
♠ x x
♥ A K J x x x x
♦ -
♣ Q x x x
♠ A K Q x x x x
♥ x x
♦ J x x x
♣ -
WNES
AnnaDanny
4♥4♠
---

East opened 4♥ and I felt I had no choice but to overcall 4♠. This was passed out.

The defence started with two Hearts then East wisely played a third one. I discarded a Diamond hoping that I would be able to ruff this Heart in dummy with the ♠T and enjoy the Clubs. But of course West ruffed with the ♠J and cashed three Diamonds, for 4♠-3.

Could we have beaten 4♥? I would have lead the my top two Spades. Anna needs to ruff the second one and cash her Clubs. If she fails to ruff my winning Spade then declarer can use dummy's Diamonds to discard some Clubs.

Losing 150 was worth 6/10 matchpoints, the most common score being +650 for East-West.

At the break we had a cracking cup of tea. They put four biscuits in the middle of our table; Anna grabbed a Mint Club for herself and I settled for a Cookies and Cream KitKat.

Twice after this I was declarer when the opponents had a twelve card heart fit. We judged this one nicely:

♠ Q x x x
♥ -
♦ Q J x x x
♣ K J x x
♠ A x
♥ A K x x x x x
♦ A x
♣ A x
9
196
6
♠ x x
♥ J T x x x
♦ K x
♣ Q x x x
♠ K J T x x
♥ Q
♦ x x x x
♣ x x x
WNES
AnnaDanny
---
2♥x4♥4♠
5♥5♠--
x---

West opened a strong two and Anna didn't hesitate to double, with nine points but perfect shape. East bumped it up to 4♥ but Anna's double was perfect for me as South so I bid 4♠. We got to 5♠ before West doubled and I had to play it.

The defence simply cashed their four tricks for 5♠x-2 and -300. If they play more Clubs I could go three or even four off, but as it is our score got 10/10 matchpoints. All the other East-West pairs made game, with one making 6NTxx (needs a Spade lead to beat Slam).

We finished the evening on 64.5%, good enough for second. It was a great afternoon - see you in 2019!

Saturday 28 July 2018

Mull of Kintyre

Last week in the Mull of Kintyre I had the pleasure of playing a few hands with Anna's family. They don't play bridge competitively but have very good card sense, and there were some interesting deals.

The makeshift bidding worked well, though we missed a few slams. This was the biggest hand:

♠ A J x
♥ K Q J 9 x x
♦ A K x x
♣ -
♠ K x x
♥ T x
♦ x
♣ A Q x x x x x
18
98
5
♠ x
♥ A x x x x
♦ x x
♣ K J x x x
♠ Q T x x x x
♥ -
♦ Q J x x x x
♣ x
WNES
2♥3♦
-4♦-5♦
---

North opened a strong two and South chose to bid the Diamonds instead of the Spades. They got up to game and West lead a small Spade. Perhaps fearing a Spade ruff declarer went up with the ♠A, drew trumps, then lead the ♥K, making all 13 tricks when the ♥A was onside.

6♦ and 6♠ are both excellent contracts, though hard to get to with the low point count and Heart misfit. Note that despite having twelve clubs between them East-West can't get into the auction.

During the evening we swapped round partners; here's an example of what happened when the two overbidders were paired up:

♠ K x
♥ Q T
♦ K x x x
♣ K J x x x
♠ x
♥ A J x x x
♦ Q J T x
♣ A x x
12
127
9
♠ x x x
♥ K x x x
♦ A x x
♣ x x x
♠ A Q J T 9 x x
♥ x x
♦ x x
♣ Q x
AlisonDannyEllisDave
WNES
1♠
2♥3♣3♥-
-3♠-4♠
---

South took a rosy view and opened 1♠, which West was quick to overcall. I had the North hand and wasn't sure how double would be interpreted so bid a natural 3♣. East did well to support partner with 3♥ and I had a problem when it came back round. With 12 points opposite an opening hand I thought we might have game on so risked supporting parting with ♠Kx and bid 3♠. This was duly raised to game.

4♠ has some chance, as in fact we have a double fit, and I needn't have worried about the trumps. Unfortunately though we were a bit light on controls, and the defence accurately took two Diamonds, two Hearts and the ♣A before declarer claimed the rest for 4♠-2.

The consolation is that East-West could make game in Hearts, where there's potentially eleven tricks if you get trumps right.

Overall an enjoyable evening, and I'm now keen to get back to the bridge club with Anna.

Monday 9 July 2018

Rue in Whitby

On a family holiday in Whitby we never quite made it to the bridge club. However, we did play a few hands at home. Here's two where Anna and I missed the boat:

♠ K x
♥ A Q x x x
♦ A K J x x x
♣ -
♠ J x x x
♥ x x x x
♦ Q x x
♣ x x
17
38
12
♠ x x
♥ K J x x
♦ x
♣ K J x x x x
♠ A Q x x x
♥ -
♦ T 9 x
♣ A Q T x x
AnnaDanny
WNES
1♠
-2♦-3♣
-3♥*-4♦
-4NT*-5NT*
-7♦-

I was sitting South and with a nice two-suited hand opened 1♠. Anna responded 2♦ and with the partial fit I decided I could risk 3♣. Of course if I'd have opened 1♣ instead of 1♠ we'd be at the one level instead of the three level. However it didn't matter as we got there anyway. After Anna bid fourth suit forcing (to game) I showed my Diamonds and she launched into Blackwood.

With total faith in my partner remembering our system I bid 5NT, showing an even number of keycards and a void. Anna worked out it was two Aces and a void in Hearts and bid the Grand Slam. The only problem with my showing a void is that I couldn't show if I had the Queen of trumps. This turned out to be crucial.

On an opening Club lead Anna put in the Queen which held the trick. That dealt with one Heart loser. She played the ♣A to get rid of another one then played a third round of Clubs. West showed out (but wisely refused to ruff) so Anna ruffed in North then ruffed a Heart in dummy. She now has 13 tricks (3 Spades, 2 Hearts, 6 Diamonds, 2 Clubs) and all that's left is to draw trumps.

With nine trumps the normal thing to do is play off the Ace-King, but there's an extra clue here. West refused to ruff a Club, which is quite normal, but the fact that she was out of Clubs indicates that she has a lot more other cards, which slightly tips the balance in favour of finessing.

Sadly, declarer played trumps from the top and the Grand Slam went begging.

Next, my turn to bodge. A classic case of not counting your tricks.

♠ A Q T 9 x x
♥ A
♦ K x
♣ K Q x x
♠ -
♥ J T x x
♦ A Q x x x x
♣ x x x
AnnaDanny
WNES
1♠1NT
-3♣-3♦
-3♠-3NT
---

Anna opened the North hand 1♠ and I sensibly replied 1NT. Later I got to bid my Diamonds, and maybe should have again, but instead couldn't resist 3NT with my dodgy Heart stop. Luckily Anna had a Heart stop too, and even better West lead a Spade.

What I should have done is played the ♠A, then a top Club. Assuming Diamonds split 3-2 that gives me nine tricks, from 1 Spade, 1 Heart, 6 Diamonds, 1 Club.

Instead I stuck in the ♠T, losing to the ♠J. On the expected Heart return I played Spades again, forcing out the ♠K. I have now set up four Spade winners for myself (alongside the six Diamonds and Ace of Hearts), but unfortunately also have five losers (two Spades, two Hearts and the Ace of Clubs). I had a second stopper in Hearts but that doesn't matter once I've lost five tricks.

In the event the defence didn't take their winners but I still count it as a big bodge. The 'free' finesse on the first trick wasn't really free at all.

Thursday 14 June 2018

Scottish Schools Bridge Championship 2018

This is the fourth year I've taken pupils, and this year took 11 pupils on the train to Stirling. From my perspective this was the most enjoyable year yet, and I enjoyed watching all the action.

Ten teams took part. This was the top five in the final standings

1Hutchesons' Brute Force +115
2HSOG Triceratops' +41
3HSOG Penguins* +17
4Ayrshire Juniors 0
5HSOG Wolves -5

The Senior Hutcheson's team won again, which is probably good as they are the Scotland Junior Team. My S2 boys came a creditable second, my novices team came third (albeit unofficially as they had one adult filling in), and the S3 girls came fifth.

With a wide range of experience the bridge was of varying quality. Here are a couple of highlights. Firstly, a nice auction:

NS vul
N deal
♠ T 5 4 3
♥ Q 7 6
♦ T 5 4
♣ Q J 2
♠ K Q 8
♥ J
♦ K Q J 8
♣ K 9 6 5 4
5
158
12
♠ 7 6
♥ A 9 3 2
♦ 7 3 2
♣ A T 8 7
♠ A J 9 2
♥ K T 8 5 4
♦ A 9 6
♣ 3
WNES
--1♥
2♣-3♣x
-3♥--
--

South opened 1♥, West overcalled, East raised, then South made a takeout double. North replied 3♥, passed out. Textbook. The only issue is that 3♥ doesn't play very well and went two off. At the other table I was watching the auction was the same, minus the final takeout double, and 3♣ made with an overtrick.

The hand notes provided at the end say that West should instead double, which is surely right, but here in fact the pairs playing in Clubs did much better.

Next, some solid defence:

NS vul
W deal
♠ Q 3
♥ A J 2
♦ A K T 9 7 3
♣ J 4
♠ K 8 6
♥ K 6 5
♦ Q 8 4
♣ K Q 5 2
15
1311
1
♠ A 9 7 5 2
♥ Q 7 4
♦ J 2
♣ A T 7
♠ J T 4
♥ T 9 8 3
♦ 6 5
♣ 9 8 6 3
WNES
1NT2♦2NT-
3NT---

West opened a standard weak NT, and North overcalled a natural 2♦. East ought to bid 2♠ but instead bid 2NT, which West unwisely raised to game. North thought about doubling but Passed and lead out the top Diamonds. Declarer won the third round then had a think.

3It's not possible to make the contract legitimately as you can't get to nine tricks without letting the defence back in, so there's two options. Probably the best option is to lose a Spade to South, and hope she doesn't find a Heart return. Instead, played a Heart. North popped up with the Ace and cashed his last three Diamonds for two off. Well played.

Another highlight was that of the three slams bid in the day, two were from one of my new players.

In general the pupils coped really well, especially as lots of them were new to competition. I must though mention the frustration watching all the usual mistakes in the declarer play. These are:

  • In a suit contract, failing to draw trumps, instead trying to cash other winners that get ruffed
  • In a suit contract, drawing too many trumps, instead of using dummy's trumps to ruff
  • In a no trump contract, failing to build tricks, instead cashing winners in short suits
  • Not keeping track of which high cards have been played

    Next year we'll fix all these and win the event!

  • Saturday 21 April 2018

    Dealing with 4-1 trumps

    I think being a good bridge player means having played enough that you are familiar with all sorts of things that might happen at the table, so you can deal with them automatically and don't have to think too much.

    Last night I played at the St Andrew Bridge Club with John Faben. Twice I was declarer in a routine contract that was suddenly in jeopardy when trumps didn't split nicely. I didn't cope well. Here's the first:

    JohnDanny
    WNES
    -2NT-
    3♣*-3♦*-
    3♠-4♥-
    --

    I upgraded the 19-point East hand to open 2NT. We don't play together often and our system is based entirely around bidding Puppet Stayman whenever possible, so John duly bid 3♣ which asksfor a five card major. I didn't have one, so he then bid the major he didn't have and I bid game.

    I got a friendly lead of ♦A and another Diamond. Looking at dummy I thought I would now make 11 or 12 tricks depending on the Club guess. I started drawing trumps. On the second round South showed out, so I now know that North has a trump trick. I played one more round of trumps, leaving North with just the winning ♥J. I then set about Clubs, cashing the ♣A then leading the ♣J to finesse South.

    Then, and only then, did I stop to think. If this Club finesse lost, then North could draw my remaining trumps and win all the Diamonds. Although I thought South more likely to have the ♣Q, I could have safe guarded my contract by finessing the other way, as if South won the ♣Q she couldn't draw my trumps. Even better than that, I should have started on Clubs after only two rounds of trumps. That way if the Club finesse lost no return would hurt me - and if playing Clubs early somehow lead to a Club ruff North would only be ruffing with a natural trump trick.

    At the table I had to make a decision. I could put all of my eggs into one basket, carry on with the finesse of ♣Q against South and make 11 tricks if it worked, or back down and try something else. I backed down. I tried the ♣K from dummy (might drop the ♣Q), then sticking with the idea that North had the ♣Q took a Spade finesse, which if successful would also have lead me to ten tricks.

    My Spade finesse failed, South cashed the ♣Q she wasn't supposed to have and with a trump trick still to lose I was down one in a 29 point game.

    On the very next hand I had a chance to redeem myself, when trumps also split 4-1. Had I learned my lesson? Sadly not.

    JohnDanny
    WNES
    1♣1♥
    x3♥3♠-
    4♠---

    I opened the East hand 1♣ and when partner showed Spades via a double we soon got to game.

    South helpfully cashed her ♥A and continued Hearts. It looks like my only other loser is the ♠A, so as before I set about drawing trumps. North ducked the first two rounds. At this point I should simply play a third round of trumps. If North takes the Ace now I can win any return, draw trumps and I'm home. If he ducks again, leaving himself the bare ♠A, I also just start taking my winners and let him get his one trick at any point.

    But I had another plan - a foolish one. I ruffed a Heart in dummy, then played a round of Spades. North won his Ace and suddenly it dawned on me. If he makes me ruff now (by playing a Heart) I'm out of trumps and he still has one left. Now there is not in fact any danger here, as we've had three rounds of Hearts already so he doesn't have any, but I still feel I messed up as I didn't see that coming.

    In the event North returned his final trump and I claimed the rest for 4♠+1.

    So what have I learned? I'm not sure, but next time when the trumps split 4-1 I'll play side suits early, and avoid ruffing so I can keep trump control.

    The rest of the evening had some highs and lows. At one point we bid to a rather dicey 7♠ (most other tables were in 4♠) which is makeable but went one off. Perhaps John will detail his rue about that on his blog. Towards the end of the evening I got very tired, and at one point when I knew I had the setting trick against 6♣ just focused on following suit and not revoking to give the contract away.

    I hope to play again soon.

    Sunday 25 March 2018

    Friendly vs Hutcheson's

    Yesterday I took twelve pupils from the HSOG bridge club on the train across town to face Hutcheson's Grammar School. This was the return match of the friendly we played last year. They beat us comfortably last time, but this time we prevailed. In the top match they narrowly beat us, and it was also close on the novices match, but a mismatch on the second match led to a comfortable win overall.

    The match was very well organised, with just the right amount of boards (not many) and a decent break in between them for some sandwiches.

    It was interesting watching the different standards. For example, on one hand I watched on the top table our pair bid to a solid 4♠ gaining when the other table stopped in an overly conservative 3♠+1. In 4♠ our declarer confidently won the opening lead, drew trumps, unblocked a suit, crossed to dummy, discarded a loser then took a losing finesse and claimed ten tricks.

    On the third table things were much more unpredictable. My new players had moments of inspiration where they made thoughtful plays (e.g. overtaking a winner to get to dummy), but then also did inexplicable things (discarding an Ace). At one point I suffered the sensation that must be common to many bridge teachers of watching a new player set up a winner, thinking "he's done that well" only to see him neglect the winner as he hasn't realised it was high.

    Our bridge club is much less developed than the Hutcheson's equivalent, and in the bidding the pupils rely more on instinct than counting points. I hope to introduce more accurate bidding and, more importantly, more thoughtful declarer play and defence in the future.

    The IMP scoring (and in fact, any scoring), was new to several of them. The two boards below demonstrate it in action:

    Board 20
    All Vul

    W deal
    ♠ Q 8 7
    ♥ J 7 6 3
    ♦ 5 3
    ♣ A K Q J
    ♠ T 4 3
    ♥ A K Q 9
    ♦ A K 7
    ♣ 9 8 2
    13
    165
    6
    ♠ A J
    ♥ T 8 4 2
    ♦ 9 8 4 2
    ♣ 7 5 4
    ♠ K 9 6 5 2
    ♥ 5
    ♦ Q J T 6
    ♣ T 6 3

    Looking at all four hands you would expect East-West to reach a contract in Hearts, and indeed that is what mostly happened. With his solid-looking Hearts West might get overboard, but the hand is flat and the defence have three Club winners along with a Spade, Diamond, and even a trump in North, so 7 tricks looks about right. In reality between 6 and 9 tricks were made when playing in Hearts. Two Wests instead played in NT.

    In our match Tables 1 & 2 were paired, as were Tables 3 & 4, and Tables 5 & 6. The table below showed exactly what happened at each table, with all scores from our perspective:

    Table 1 Table 2
    EWNS
    Jonny & Julianna Amelie & Samthana
    1♥ W = 2NT W =
    Scores +80 -120
    Net score -40
    Net IMPs -2 to HSOG
    Table 3 Table 4
    EWNS
    Louis & KevinMichael & Harry
    1NT W -1 4♥x W -4
    -100 +1100
    +1000
    +14 to HSOG
    Table 5 Table 6
    EWNS
    Maxwell & Alex Robert & James
    4♥ E -2 3♥ W =
    -200 -140
    -340
    -8 to HSOG

    On Tables 1 and 2 our team made 1♥= on Table 1 for +80, but conceded 2NT= on Table 2 for -120. This lead to a 40 point loss overall on that board for that match, which translates to a 2 IMP loss (IMP lookup table here: https://www.bridgehands.com/I/IMP.htm). In the next match we conceded 100 on Table 3 going off in 1NT but gained spectacularly on Table 4 when our North decided he was worth a double of 4♥, and took it four off for 1100. The net 1000 point advantage lead to a 14 IMP gain. In the final match we lost points on both tables leading to an 8 IMP loss. So overall, across the whole match, that was a 4 IMP gain (all down to the big penalty on Table 4).

    The next hand had a greater variety of contracts:

    Board 21
    NS Vul

    N deal
    ♠ A 8 4 3
    ♥ A 8 3
    ♦ 8 3
    ♣ Q 7 3 2
    ♠ Q J T 7 5
    ♥ 6
    ♦ K J 7 6
    ♣ K T 6
    10
    1014
    6
    ♠ K 6 2
    ♥ Q T 9
    ♦ A 9 2
    ♣ A J 5 4
    ♠ 9
    ♥ K J 7 5 4 2
    ♦ Q T 8 5
    ♣ 9 8

    Table 1 Table 2
    EWNS
    Jonny & Julianna Amelie & Samthana
    4♥ S -3 4♠ E =
    Scores +300 -420
    Net score -120
    Net IMPs -3 to HSOG
    Table 3 Table 4
    EWNS
    Louis & KevinMichael & Harry
    3♠E= 4♥ S -3
    +140 -300
    -160
    -4 to HSOG
    Table 5 Table 6
    EWNS
    Maxwell & Alex Robert & James
    4♠ E -1 1NT E -1
    -50 +50
    0
    0 to HSOG

    Looking at all the hands East-West have a game in Spades, but that was bid only once. On the table I watched East played in NT, and although the defence got off to the best start in Hearts they somehow let declarer take a trick. But rather than go after the Spades, declarer then went for the short-term gain of cashing all her winners and finally finished minus one.

    The table below shows the final results from the different matches (again from our perspective):

    Match 1 Match 2 Match 3
    First half-13+21+7
    Second half+1+27+1
    Total-12+48+8HSOG win by 44 IMPs

    Wednesday 17 January 2018

    Frischmann Junior Pairs

    I took nine pupils on the bus to Edinburgh to compete in the National Junior Pairs. Since this event is partly used to select the Scotland Junior team, and Junior goes up to under-26 in bridge, there was a high standard. In fact I'd say there were two competitions, one between the more experienced players to see who would finish top, and one between the more junior juniors to be the best of the rest.

    My juniors stepped up to the occasion well, and coped with playing in a more formal setting well. The only time when when standards slipped was when a table consisted of our of our pairs against another one of our pairs. "You're all crazy!" observed a neutral.

    With matchpoint scoring, few tables and varying quality there was a large degree of randomness in the scores, and more than ever if you got a good positive score you almost certainly got a good result. Here's a couple of example boards:

    It's an interesting board as it's not clear what the final contract might be, and in fact the four tables all went quite differently. Once East-West made a part-score in Hearts, once South went one off in 2♦x. The bigger scores came when South overcalled in 1NT (off four) and when North-South played 3♠x (also off four).

    This board belongs to East-West. The one North declarer only managed seven tricks in 3♥ (I'm not sure how this is possible!), which was costly as at two other tables East-West went down in 5♣, and West also made 1NT. I was impressed by one auction:

    SBJMJSBAB
    WNES
    1♠
    2♣2♥-3♥
    4♣-5♣-
    --

    South made the obvious 1♠ opening bid and West overcalled 2♣. We've not yet discussed doubling first with big hands, but I think many would still overcall the West hand 2♣. North made a bold raise to 2♥, he ought to know this requires ten points but his intention is certainly right. South found a good Heart raise (more effective than bidding 2♠) and West, undeterred, ploughed on with 4♣. East paused for a while then found a reasonable 5♣ raise.

    North lead a Spade (partner's suit) which declarer won and drew trumps. She then finessed with a Diamond to the Ten, which South grabbed and cashed two Hearts, for one off. Good bidding, play and defence.

    Overall the event was handsomely won by Glen Falconer & Damien Murray with an impressive 73.40%.

    Tuesday 2 January 2018

    Overcompensating

    Zia Mahmood says in his book Bridge, My Way that if your partner is an underbidder you shouldn't try and compensate for her by overbidding, and likewise if your partner tends to overbid you shouldn't compensate for that either. I think the idea is that although trying to account for your partner's bidding might get you a better result on the particular hand you do it on, they'll then keep on bidding that way. Instead, bid normally, and let them get to the wrong contract a few times then they'll correct their ways.

    Anna is relatively timid, and I was guilty of trying to compensate for her in a hand last week. Even though I had opened 1NT so she knew our combined strength much better than me I still took matters into my own hands and doubled the final contract, when it should have been her. In a sense I was right to double, as it went two off, but next time I'll try and pass.

    No one vul
    S deal
    ♠ A T 9 8 x
    ♥ x x x x
    ♦ Q T x
    ♣ x
    ♠ x
    ♥ A Q x x
    ♦ K x x
    ♣ A Q J 8 x
    6
    164
    14
    ♠ Q J 7 x x
    ♥ T x
    ♦ J 9 x x x
    ♣ T x
    ♠ K x
    ♥ K J 9 8
    ♦ A x
    ♣ K x x x x
    AnnaSDanny
    WNES
    1NT
    2♣2♠--
    x-3♦-
    3NT--x
    ---

    I opened the South hand with a maximum 1NT. Playing natural methods, West overcalled 2♣ and North made a weak take-out to 2♠. This was passed round to West who doubled for takeout. East was tempted by a Pass (2♠x probably goes one off, losing two Spades, two Hearts, a Diamond and a Club but might make if West is on lead a lot) but finally went for 3♦, which West recklessly converted to 3♦, hoping that it was her partner who held all of the outstanding points.

    As it was, North had two vital high cards, which combined with the 1NT opening in South should have been enough for a double. Unless, of course, North believed that West had a long Club suit, and was hoping to make 3NT based on that. When it came round to me as South I knew that the Clubs weren't running so risked a double.

    North lead the ♠T, covered in dummy. I presumed West had the singleton Ace and ducked, letting dummy's ♠Q hold the trick. Declarer took a successful Heart finesse then played on Diamonds, leading low from hand. North popped up with the ♦Q and lead a Spade to my ♠K, and I was then able to set up two Heart tricks for the defence, to go with one Spade (as North never got her ♠A), two Diamonds and the ♣K at the end. Six tricks for the defence meant 3NTx-2.

    Declarer does better to play on Diamonds straightaway, and although short of dummy entries may just be able to stumble home with a Spade, two Hearts, three Diamonds and three Clubs. Without those Heart tricks it's not clear where the defence's tricks are coming from, and they could be limited to two Spades and two Diamonds.